Welcome to GL Interior
Green Living Interiör

Anything you need in reupholstery
- 076-127 66 24
- info@glinterior.se
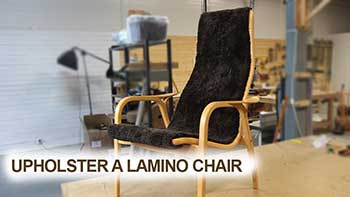
Lamino Chair, Reupholster your Loungchair
Upholster your furniture can be both very stimulating and in many cases an economic advantage. It also doesn't have to be overly complicated, but there are of course both easy and more difficult items to upholster.
I thought that I will in this article explain how you could upholster your Laminochair with sheepskin. This project I will consider a relatively simple job. However, there are some steps where you will have to pay attention to a litte bit more, sheepskin is expensive material you do not want to make mistakes. You also do not need any special tools for this work, although it will of course be both easier and faster if you have an automatic stapler, however a regular stapler is good enough. In addition, I will provide a number of tips to make the job easier. For each step I have also attached one or a couple of photos that visually show the different steps. The work will take approx. 4-6 hours depending on how handy you are. If you have the chair "laminate" that needs to be upholstered, the workflow is the same.
Sheepskin
In this project we have used the same sheepskin that is included in our kit which we also sell through our webshop, this is the original leather from Skandilock. In this case, it's the shade of Charcoal. Skandilock is the supplier that delivers to Swedese amongs others. The hide comes in a custom cut size that fits the Lamino armchair precisely. The fur is about 17mm thick and can be selected in a variety of colours. Please visit our shop for all colours of choice. You will find our range of sheepskin in our webbshop
Step 1. Dismantle and remove old fabric
Begin by removing the two armrests, these are fastned with four screws, two on each side. Then unscrew the two sideframes, these are fastned with a bunch of screws along the back side.


Step 2. Attaching the backer fabric
Attaching the backer fabric on your Lamino is probably the most complicated part of your work. It may seem difficult to get the fabric tense and without "wrinkles" but by working methodically this step will go well. Note Important !: The "brace / strut" between the frame must be mounted both front and rear. place the fabric on top of the chair and distribute and center the fabric over the frame. Temporarily attach the fabric with a pair of staples on one side of the curve between the seat and back and in the front and top of the seat, these staples can later be removed. The recommended length of staples is 8 to 10 mm deep. Start attaching the fabric from the middle of the curve, the same side as you attached the temporary staples, attaching about 1/4 of the armchair. If you find it difficult to fold over the fabric then cut relives cut to the fabric, it will then go easier. When you have attached one side of the chair, flip it over and start tighten the fabric using the pincers. To give you a nice and smooth surface around the curve on the lower back, it will be an advantage to make a few cuts in the linen, these help you to tighten up the weave and get it smooth. The may have to loosen some staples in order to get it smooth. The weave should be as smooth and hard as possible, smaller wrinkles in the fabric are not crucial, these will disappear when you glue on the reinforcing fabric and sheepskin. However, the better you do the job of tightening the fabric and the smoother the better the end result.


Step 3. Attach the foam pieces in line with the ends of the frame
Glue the polyether piece into place by spreading a thin layer on the fabric. Tip, place the polyether pieces onto the linen and mark the edges on the linen using chalk or a pencil. By folding the linen weave over before glueing and cut to the correct length it will then be easier when glueing. The fabric should be folded twice at the edge about 1 cm to avoid visible fringes. Make sure the fabric fits in line with the bottom of the foam pieces. Attach the fabric to both sides, then work the two together, the polyether piece and the fabric by massaging the two toghter.


Step 4. Attach the reinforcing fabric and triming
The reinforcing fabric is also the rough linen fabric 650 g / mm², this should be mounted on the sitting surface of the armchair. Glue the reinforcing fabric to the seat by spreading a thin layer of glue on the existing fabric of the armchair. However, first test the reinforcing fabric by placing it on top of the chair and mark where you are to glue before gluing it. You can mark where to apply glue by marking the front and back edges with chalk or pencil. When gluing, make sure to massage the fabric to the underlying surface. Cut off the edges so that they protrude about 1.5 cm from the edges of the frame. Then fold the fabric over the frame and fasten it with staples. Massage the fabric outward while attaching it to the edge so you will get a nice result.


Step 5. Mount the sheepskin onto your chair
Now we have come to the task that requires the most accuracy, it can be both ugly and expensive if we do not spend enough time and focus on this particular task. Test mount the sheepskin before gluing is a must. Important information: Once the glue is in place and you attached the hide, you will only have a few minutes to adjust any mistakes, but do not let the hide sit on for too long, hence the importance to make a thorough review before the sheepskin is mounted.
Start by placing the sheepskin over the body, center the skin and be extra careful that the skin covers sufficiently around the front and back (back, see picture).
Now place the chair on the back and roll up the sheepskin. , avoid moving the sheepskin. Spread an even layer of glue over your back. Roll back the skin and make sure the skin is sufficiently around the upper edge, massaging the sheepskin so that it adheres to the fabric. Now you do the same with the seat, raise the armchair, roll up the leather and glue it together.
Now attach the hide to the edge the same way you did with the weave, however you do not have to streath the hide the same way as when you attached the linen fabric. Make sure that the upper and lower corner do not get too thick, it would otherwise be difficult to mount the outer frame. Trim the edges the same way as you trimmed the linen weave.


Step 6. Assemble your Lamino armchair
Now your project is getting towards the end. The armchair has new weave and new sheepskin, it is starting to look really good. All that remains is to reassemble the outer frames and armrests. Now you are glad that you initially placed all the screws in one place.
You have now upholstered your Lamino loungechair and what a difference.
You will find all our range of sheepskin in the webshop
If you have any further thoughts or questions, please contact us for further advice and tips.


